
You Might Not Need Module Federation: Orchestrate your Microfrontends at Runtime with Import Maps
TL;DR
Managing microfrontends in a complex feature-rich app can become a tedious task and easily turn it into a Frankenstein's monster when there's no clear strategy involved.
Using third-party tools like Webpack Module Federation helps to streamline the building and loading of microfrontends, but leads to vendor lock-in, which can be a problem.
Import Maps can be seen as a web native alternative to Webpack Module Federation to manage microfrontends at runtime. In this article, we will:
• Explore the concept of Import Maps
• Build a demo app
• Summarize the pros & cons
Import Maps in a nutshell
The concept of Import Maps was born in 2018 and made its long way until it was declared a new web standard implemented by Chrome in 2021 and some other browsers.
Import Maps let you define a JSON where the keys are ES module names and the values are versioned/digested file paths, for example:
<script type="importmap">
  {
    "imports": {
      "my-component": "https://assets.mycompany.io/scripts/my-component/index.5475c608.js"
    }
  }
</script>
Such mapping can be resolved directly in the browser, so you can build apps with ES modules without the need for transpiling or bundling. This frees you from needing Vite, Webpack, npm, or similar.
Import maps allow us to write:
import 'my-component';
instead of the following:
import 'https://assets.mycompany.io/scripts/my-component/index.5475c608.js';
and let the browser resolve the actual path at runtime.
Advanced Import Maps features
You can reuse an import specifier (for example lodash below) to refer to different versions of the same library by using scopes. This allows you to change the meaning of an import within that given scope. As a result, any module in the https://assets.mycompany.io/scripts/my-components path will be using lodash-es version 3.9.3 while all other modules will use version 4.17.21.
<script type="importmap">
  {
    "imports": {
      "my-component": "https://assets.mycompany.io/scripts/my-component/index.5475c608.js",
      // allows import { my-component } from "component-library" syntax
      "component-library/": "https://assets.mycompany.io/scripts/my-components/",
      "lodash": "https://esm.sh/lodash-es@4.17.21", ⬅
      "lazyload": "IntersectionObserver" in window ? "./lazyload.js" : "./lazyload-fallback.js",
    },
    "scopes": {
      "https://assets.mycompany.io/scripts/my-components/": {
        "lodash": "https://esm.sh/lodash-es@3.9.3" ⬅
      }
    }
  }
</script>
You can also construct an import map dynamically based on conditions: the example above taken from this article shows how you can load different modules based on the support of IntersectionObserver API.
Demo app
In this article, we bring the idea of Import Maps further by placing an Import Map between the host app and microfrontends and applying the dependency inversion principle. This makes the host app not directly dependent on a concrete microfrontend version or its location, but rather on its abstraction via name or alias.
We are going to build an online store that has only one, but highly customizable assortment type: T-shirt.
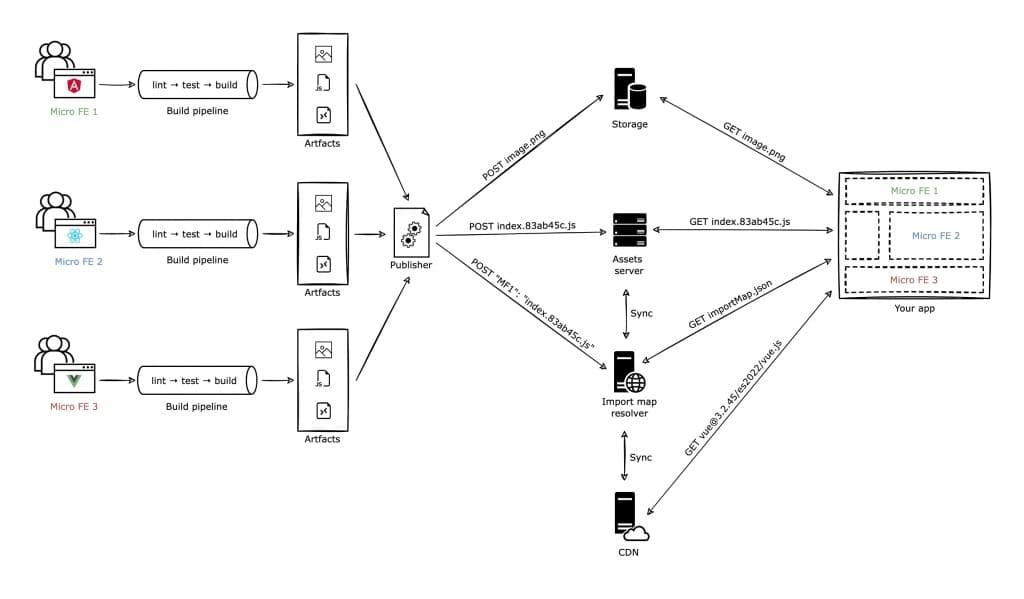
Step 1: Outline the Architecture
There is an arbitrary number of microfrontends that are assigned to the development teams, each of them is free to choose the tech stack, build and CI/CD tools. The “only” constraint is to make sure each build pipeline produces 3 artefacts: ESM bundle, Manifest and other Static Assets.
The lightweight Nest.js Import Map Resolver server has two main roles: store and update the importmap, but also handle the submission of JS assets. Single-spa has a similar solution available.
The Publisher will read your Manifest, extract the bundle filename as well as externalized dependencies and publish them to the Import Map Resolver.
The Assets Server is used as a Web-enabled storage to host JS assets. To store images, videos, and other assets we can choose an arbitrary Storage, for example, an Amazon S3 bucket. CDN is used to serve third-party libs and frameworks as ES modules, a good one is ESM.sh.
ESM bundle
Your production-ready application ESM bundle is generated by Webpack, Vite, Rollup or any other bundler of your choice. For simplicity of the setup, CSS Injected By JS plugin for Vite is used along with the scoped styles to build a single ES module with injected CSS.
If your build produces more than one bundle (for example, due to code splitting), you have two options:
- concatenate them after the build, for example via concat
- alter the Publisher to loop over the multiple entry chunks and add the prefix, e.g.:
my-component:main,my-component:polyfill, and so on.
Manifest
This is a JSON file that contains the mapping of non-hashed asset filenames to their hashed versions and, if you are using Vite, you just need to add manifest: true to your Vite config. This will produce the following file in the /dist of your project:
{
  "main.js": {
    "file": "assets/index.fb458d74.js",
    "isEntry": true
  },
  "views/cart.js": {
    "file": "assets/foo.869aea0d.js"
  }
}
The generated Manifest will be used by the Publisher to know the mapping of your microfrontend unique name to its ESM bundle.
Static assets
Everything else, such as images, videos and other static files required by your microfrontend.
Step 2: Define the UI and split into microfrontends
Our online store demo app will have three views: Home, Product & Cart:
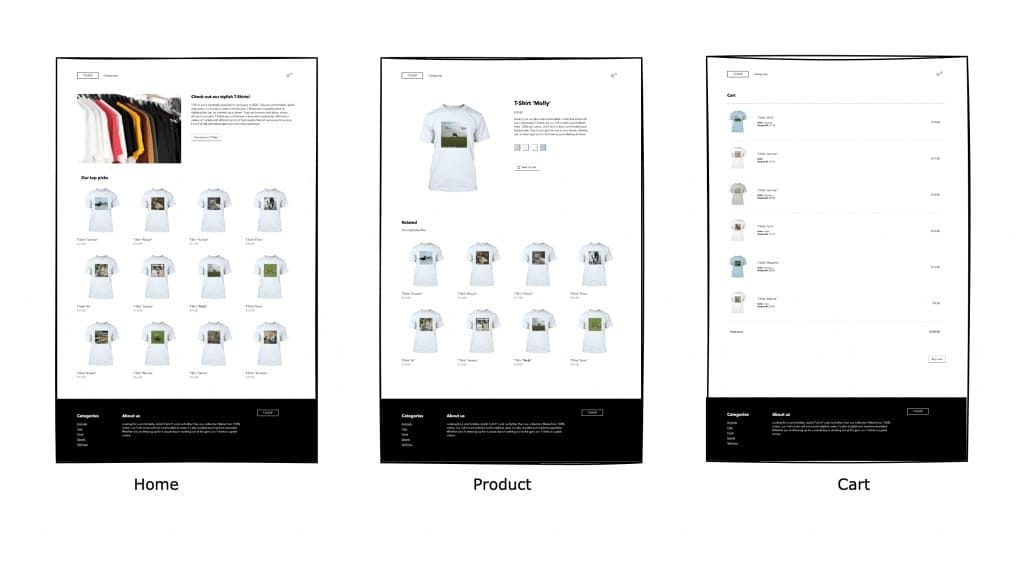
Vue is used as a core “metaframework” to have out-of-the-box routing, simple state management with Pinia and Vite as a bundler. It is not necessary at all to use the “metaframework”, moreover, during the build, you’ll get errors from Vite's internal import-analysis plugin because of unresolved imports (good news, there is a solution for that, see “Challenges → Metaframework”).
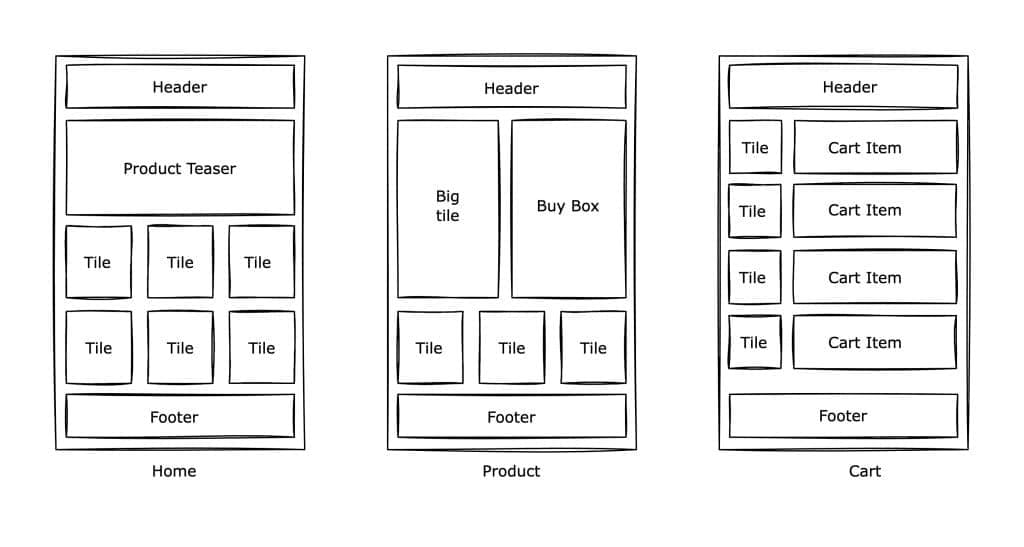
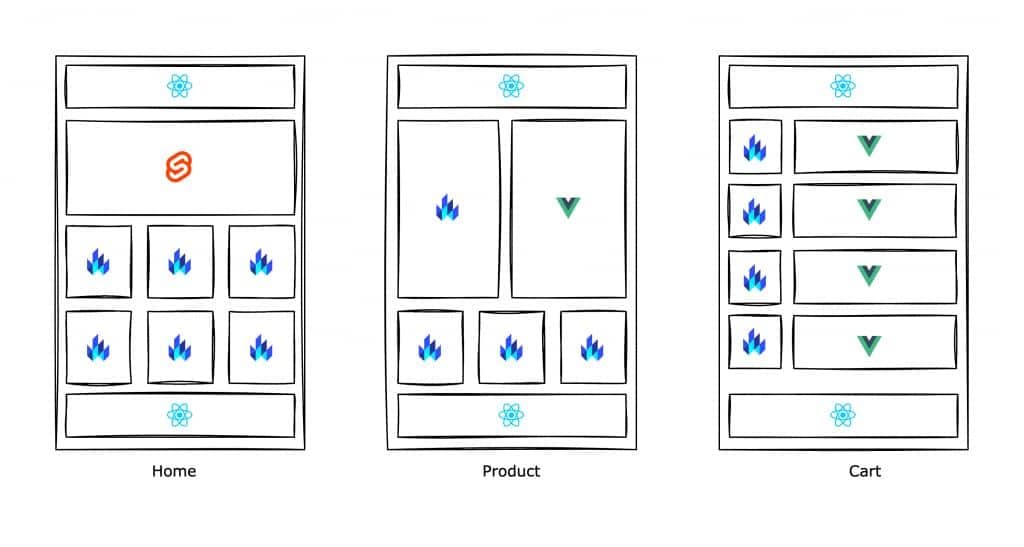
To demonstrate how several microfrontends can co-exist together on the same page, they are built with four different frameworks. To make each app's setup look similar, Vite template presets are used to generate Vue, React, Lit and Svelte microfrontends that are compiled into Web Components. You may consider splitting your app by functional area and building your microfrontends around business domains, such as Order, Product, etc.
Step 3: Build the app
The full source of the Demo app can be found here.
Common problems & solutions
Take control away from the bundler when resolving imports
How do bundlers work? If you ignore the implementation details and go to the highest level of abstraction, they concatenate all the jungle of JS modules and put them into one big chunk, that is minified, uglified, and tree-shaked to get rid of unused code. Simple concatenation wouldn’t work. You need to indicate the entry point and make sure you don’t have modules that import themselves - cyclic dependencies. Most of the bundlers solve this by building an abstract syntax tree. For example, Rollup does it with Acorn.
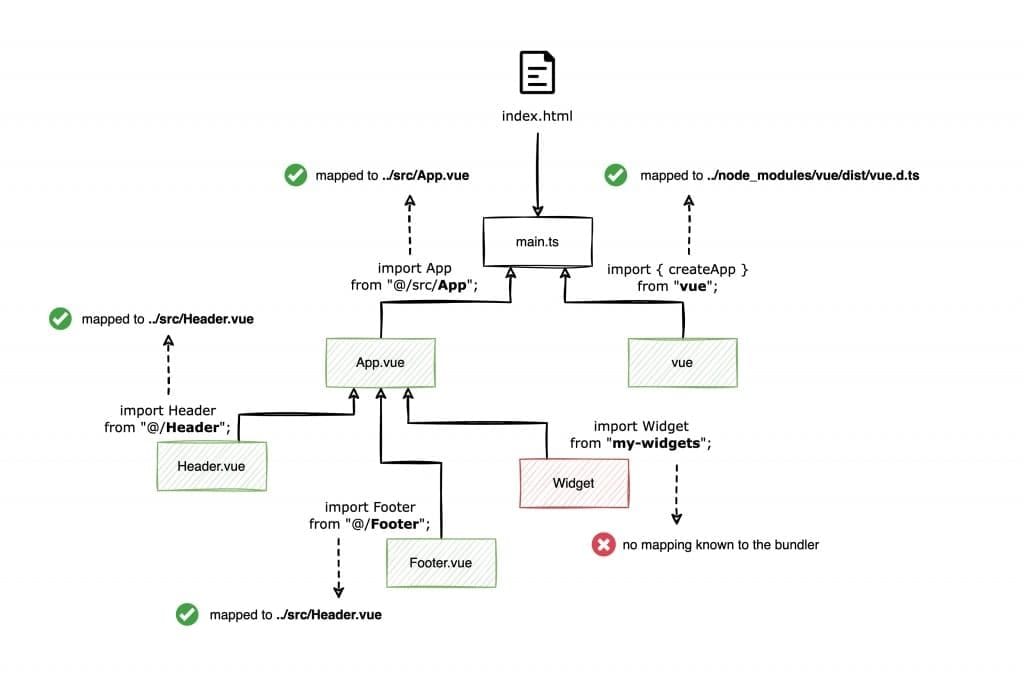
Using micro-frontends resolved via Import Maps introduces a challenge for your bundler that should normally know your dependencies at compile time, not at runtime. We need to tell Rollup to stop building the tree once a dependency from the Import Map is met and make the current module a leaf node.
Luckily, Vite, Rollup and Webpack have options to take control away from the bundler and let the browser resolve the specified imports by providing their names in the configuration.
import { defineConfig } from "vite";

export default defineConfig({
  build: {
    rollupOptions: {
      external: [
        "widget",
        "some-other-widget",
        "lodash"
      ],
    },
  },
});
Load import map dynamically
Specs say that “any import maps must be present and successfully fetched before any module resolution is done”. Essentially, it means that the importmap must be inserted in the DOM earlier than any other async script.
Vite is internally using build-html plugin, that produces index.html with the entry point added via <script type="module" src="bundle.js> tag to the <head> section. This is not what we want. Instead, we would like to execute a script that will fetch the import map first, add it to the page, and then load the app script.
To build a custom index.html the Async Import Map plugin for Vite was created that is internally using Rollup Plugin HTML. The plugin extracts the entry point script from the list of generated assets (by lookup for isEntry: true), stashes it, loads the import map from the specified URL and then unstashes and appends the entry point script, giving control back to your app.
See full source here.
Shared state and communication
Eventually, there are only 6 ways to share the state across microfrontends:
- Windowed Observable uses the global
windowobject as the medium to share the data, often wrapped into a pub-sub library - Web storage, such as Local Storage, Session Storage or Cookies
- URL via query / params
- In-memory (e.g. Redux)
- Backend (session or persisted state)
- Props and Custom events / Callbacks
Everything else you may come across could be just an abstraction on top of these methods. Here is a good summary of their pros and cons.
Since the goal is to use as many native web capabilities and avoid vendor lock-in, we can stick to Props & Custom Events. One important note to mention: to let an event “escape” from the Shadow DOM, we need to set bubbles: true and composed: true. This way we make sure events propagate through the parent-child as well as the shadow tree hierarchy. A nice explanation can be found here.
document.dispatchEvent(
  new CustomEvent("select-color", {
    bubbles: true,
    composed: true,
    detail: 'blue',
  })
);
Shared dependencies
To share your microfrontend dependencies, you can declare them as “external” by providing them in the configuration as follows:
import { defineConfig } from "vite";

export default defineConfig({
  build: {
    rollupOptions: {
      external: ["react", "react-dom", "react-to-webcomponent"],
      output: {
        globals: {
          react: "react",
          reactDom: "react-dom",
          reactToWebComponent: "react-to-webcomponent",
        },
      },
    },
  },
});
Here we are telling Rollup to not bundle React dependencies as well as to provide global variables for them.
But how do we deal with dependency mismatches when one or more microfrontends are using the same lib, but with different versions? Let’s say Footer and Header are two React major versions apart. As mentioned before, we can use scopes:
<script type="importmap">
  {
    "imports": {
      "header": "/path/to/header/index.5475c608.js",
      "footer": "/path/to/footer/index.6087f008.js",
      "react": "https://esm.sh/react"
    },
    "scopes": {
      "/path/to/header/": {
        "react": "https://esm.sh/react@16.13.1"
      },
      "/path/to/footer/": {
        "react": "https://esm.sh/react@18.2.0"
      }
    }
  }
</script>
Alternatively, we can provide different import specifiers:
<script type="importmap">
  {
    "imports": {
      "header": "/path/to/header/index.5475c608.js",
      "footer": "/path/to/footer/index.6087f008.js",
      "react@16": "https://esm.sh/react@16.13.1",
      "react@18": "https://esm.sh/react@18.2.0",
    }
  }
</script>
If you need some sophisticated logic to build your import map, Import Map Resolver is the place to put it. Let’s say one of your microfrontends publishes its new version that uses react@17.0.1, but you already have react@17.0.0 in your importmap. In this case, the Import Map Resolver would remove an older version and replace it with the newest one. It is one minor version ahead, assuming backward compatibility is guaranteed.
Library microfrontend
Microfrontends can be published as a Custom Components library.
Example using Vite and Svelte:
import { defineConfig } from 'vite';
import { svelte } from '@sveltejs/vite-plugin-svelte';

export default defineConfig({
  build: {
    rollupOptions: {
      input: [
        './src/Header.svelte',
        './src/Footer.svelte'
      ],
    }
  },
  plugins: [
    svelte({
      compilerOptions: {
        customElement: true,
      },
    })
  ]
});
This will produce two separate chunks, one for the Header and one for the Footer. Vite supports library Mode for Vue and other frameworks.
Without going into each library configuration details, the general principle is to alter your main.ts entry point (or each of your entry points if they are many) in a way you’d like to expose your microfrontend defined as a Custom Element.
import MyComponent from '.src/my-component';
customElements.define("my-component", componentWrapperFn(MyComponent));
where componentWrapperFn is a function provided by your (or a third-party) library that returns a custom element constructor that extends HTMLElement. It could be native defineCustomElement in the case of Vue or third-party reactToWebComponent from react-to-webcomponent. Here (and also here) is a great summary of how to build Web Components with different libraries and frameworks.
Metaframework
As mentioned in the section Demo app, a metaframework is used to glue the microfrontends together. Choosing no framework is also a valid option. Import Maps perfectly support this case by resolving imports directly in the browser. The choice of using Vue is mainly to avoid writing boilerplate code for routing and make the container components lean, having little to no low-level DOM manipulation. There is a good article explaining why we need the container components and how to structure them.
Routing
Routing between container components/pages is covered by the metaframework in case you are using one. If not, you can opt for Navigo as a simple dependency-free JS router.
In rare cases, when you need navigation within individual microfrontends this is where it gets tricky: at the end, you only have one address bar. You can map the flattened structure of your compound URL state (for example, map https://my-app.com/mfe-1:article/search and https://my-app.com/mfe-3:invoice/edit/8 to https://my-app.com/(mfe-1:article/search//mfe-2:invoice/edit/8)) to enable two-level routing with the help of your framework. There is a library for Angular that uses URL Serializer to intercept and manipulate browser URLs.
That being said, this approach also introduces an unwanted tight coupling among microfrontends: the host app shouldn’t know the details of individual microfrontends routing. When a team needs to change or add a new URL, the host app would need to be adjusted and redeployed. Instead, try avoiding two-level routing at the stage of application design. To better understand all the consequences of this approach, you may want to read the book Micro Frontends in Action by Michael Geers, chapter “App shell with two-level routing”.
Pros
Let’s summarize all the benefits that Import Maps offer:
• flexibility for microfrontend teams (each team can have its own tech stack, CI/CD, coding guidelines, infrastructure: everything before final artefacts are built)
• easy step-by-step migration of existing codebases by replacing components or entire pages with microfrontends
• the host app is lean and detached from the development of microfrontends and focuses on the composition of pages, providing the data and handling events
• the host app is not aware neither of the existence nor the implementation details of your microfrontends: the only “contract” is the API of your microfrontend (props/events)
• import map entries are lazy-loaded: no JS is downloaded before you actually import()
• you may not need any build tools at all: import maps work in the browser at runtime
• it takes seconds to update your app (by changing entry in the import map)
• it takes seconds to rollback
Cons
Let’s summarize all the drawbacks that the usage of Import Maps brings:
• import Maps are not supported in some browsers, however, there are polyfills
• the overall amount of bytes downloaded when using microfrontends in comparison to monolith is unavoidably higher. Even though you can externalize and share your app dependencies, you cannot avoid eventual code duplication in individual microfrontends
• not suitable for small and medium size projects where single core framework would be a better fit
Conclusion
Using Module Federation in comparison to Import Maps has a major drawback, which is vendor lock-in, that makes your product dependent on another product: Webpack. All your micro-frontends as well as your host app must comply with it and be on the correct version. You also cannot avoid the compilation step, while Import Maps can be used directly in the browser.
At the same time, new web standards are emerging and replacing the need for third-party products. While the standard is being developed further, getting new features, such as multiple import map support and programmatic API, you can already start using them now with the help of ES Module Shims or System JS.
Related articles

Rosa Acri
#ProductCon - Product Management Conference
This article was originally published by Rosa Acri on LinkedIn.
Jul 11, 2023

Thanh Hoang Nguyen
ASKING DEVELOPERS
May 15, 2023

Raphael Marques
6 Reasons Why You Should Enjoy Reviewing Pull Requests
This article was originally published by Raphael Marques on Medium.
May 2, 2023